Set Eventbrite to increase ROI of the HubSpot-Eventbrite Integration


Once you’ve figured out that Eventbrite is right for you, it’s time to start setting everything up so that you can get the most out of your event page as well as the HubSpot-Eventbrite integration. I’ve put together a number of different steps, and tips to help you create a great registration page that will not only convert but also connect to everything else you’re doing both before, during and after go-live.
Why is it so important that you properly set everything up? Well, because if done correctly, these pages and the backend connecting everything will then be able to provide you very detailed and helpful data that will ultimately show whether or not your event was a success while allowing you to learn more about your marketing and registrants.
Account Set-Up
When you’re first putting on an event, especially as a company, you’ll want to make sure that your account is properly set up so that when registrants look at the “Organizer Profile” information, you are able to give them relevant information. Below are a number of different items you will need to consider when optimizing your Organizer Profile and account:

- Include a profile image that includes your company’s logo (this can be similar to a social media profile image)
- Provide a brief company description (200-300 words) that also connects the dots between what your company does and the event you are promoting. Be sure to check the box that allows you to use this description on your event pages.
- Link your website’s home page and company social media accounts to the profile
- Customize the colors to match your company’s branding.
- If you have more than one person who would like to receive notifications surrounding the Event, registration and contact between registrants and the organizer, be sure to provide Multi-User Access in your account settings.
Registration Page Creation
No matter if you’re holding one event or 15, you’ll first want to start with the creation of your first registration page. Eventbrite’s page builder wizard is relatively straight forward, so I won’t waste our time going through everything you’ll need to create but instead focus on some of the major items that will help you with specific areas of your event later on.

- Spend time in the Design section of the wizard customizing the page to match your branding. If you decide to create a custom header and footer for you page, remember these notes on mobile rendering.
- If you are going to be creating multiple registration pages, you will want to fully create one single page first and then clone it out to avoid hours and hours of repetitive work. This means that everything throughout this first page must be exactly the way you want it before cloning or else you risk losing hours of your life going back through all of your event pages to add new items. If you have anyone who must sign off on your event pages before you take them live, make sure they understand this as well and spend enough time going through your first page thoroughly before cloning everything out. Consider the following items below when setting up a page for duplication:
- Create an event title that both promotes the event as well as the location/date/time. This way when you duplicate the page out, the title will be easy to edit and make it easy for registrants to differentiate between your other events.
- Be aware of the time zone setting for the event start and end times so that you can change them with different events if they move across zones.
- Be aware of ticket settings for multiple events. If you have events that start at different times or days, you’ll want to make sure that you change the ticket sales start and end times to match.
- Create a custom order form for your tickets and registration process that not only collects general information about the registrant but also about their interest in your event. Questions like the following can help you later when it comes to analyzing the success of some of your promotional channels:
- How did you hear about this event?
- What topic are you most interested in for this event?
- Is this your first time at an event hosted by our company?
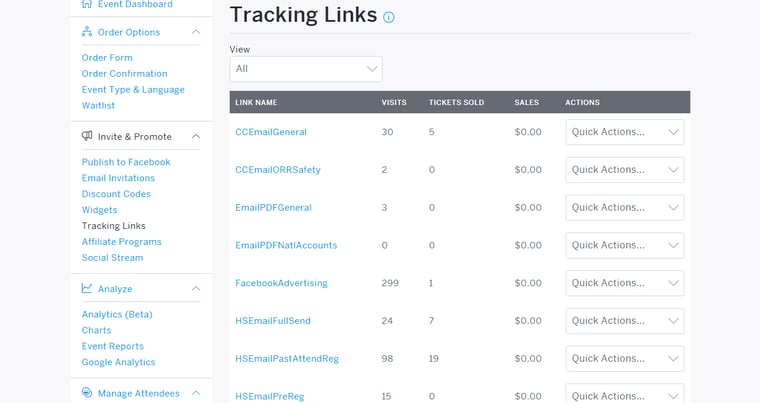
- Create custom tracking links for the different channels that you will be using to promote the event registration page. Please note that this is only helpful if you will be sending people directly to the Eventbrite pages instead of embedding the registration page on your website. Below are a few ideas for different tracking codes you may want to create:

- Social media platform-specific links (organic)
- Social media platform-specific links (paid)
- Email sends to specific lists like past attendees, past registrants, sales prospects, etc. (tracking link for each specific list or groups of lists)
- Your website’s event splash page and/or CTA
- Sales member-specific links (for different regional reps, etc.)
- Create multiple follow-up emails that will be sent out to registrants before the event occurs. Push for at least two emails, one a week before the date and the other the day before. Customize them to be location specific (and remember to edit them when duplicating the pages out) and take advantage of the automated emails to prepare your registrants for location-specific information, the check-in process and the event itinerary.

Once you’ve set up your page the way that you would like it to look and act, you’re one step closer to take everything live! Go ahead and start to duplicate out your pages and edit everything to customize each event’s information, from there you’ll be ready to properly set up the HubSpot side of the campaign after integration.
If you have any questions regarding any areas of the series laid out, please feel free to leave a comment in the sections below or email me directly at mherschberger@revriv.com.
